


Entertainment
A Daily Journey to Image Editing for Beginners

Day 1: Introduction to Digital Image Editing GIMP
Understanding the basics and building a mindset
Image editing begins with learning how to perceive visual composition. On the first day, learners are introduced to the core purpose of image editing—improving clarity, correcting composition, and enhancing storytelling. The goal is not to create something unreal but to make an image more communicative and visually appealing. A strong start includes familiarizing oneself with the workspace layout, recognizing common tools like selection instruments, zoom, guides, and the layer viewer. Exercises for this stage involve organizing practice images and observing how various edits influence emotional tone. This foundation will support more complex techniques later in the journey.
Day 2: Cropping and Composition Essentials
Reshaping visuals to guide the viewer's eye
Cropping is one of the simplest yet most powerful editing actions. It allows the user to reshape the image frame, focusing attention and removing distractions. During Day 2, learners explore the visual rules of balance and framing such as the Rule of Thirds. By using cropping thoughtfully, students can learn to control storytelling within the image. The practice section offers exercises in identifying focal points and rearranging images to highlight them better. Mastering cropping teaches precision and discipline—essential qualities in the editing process.
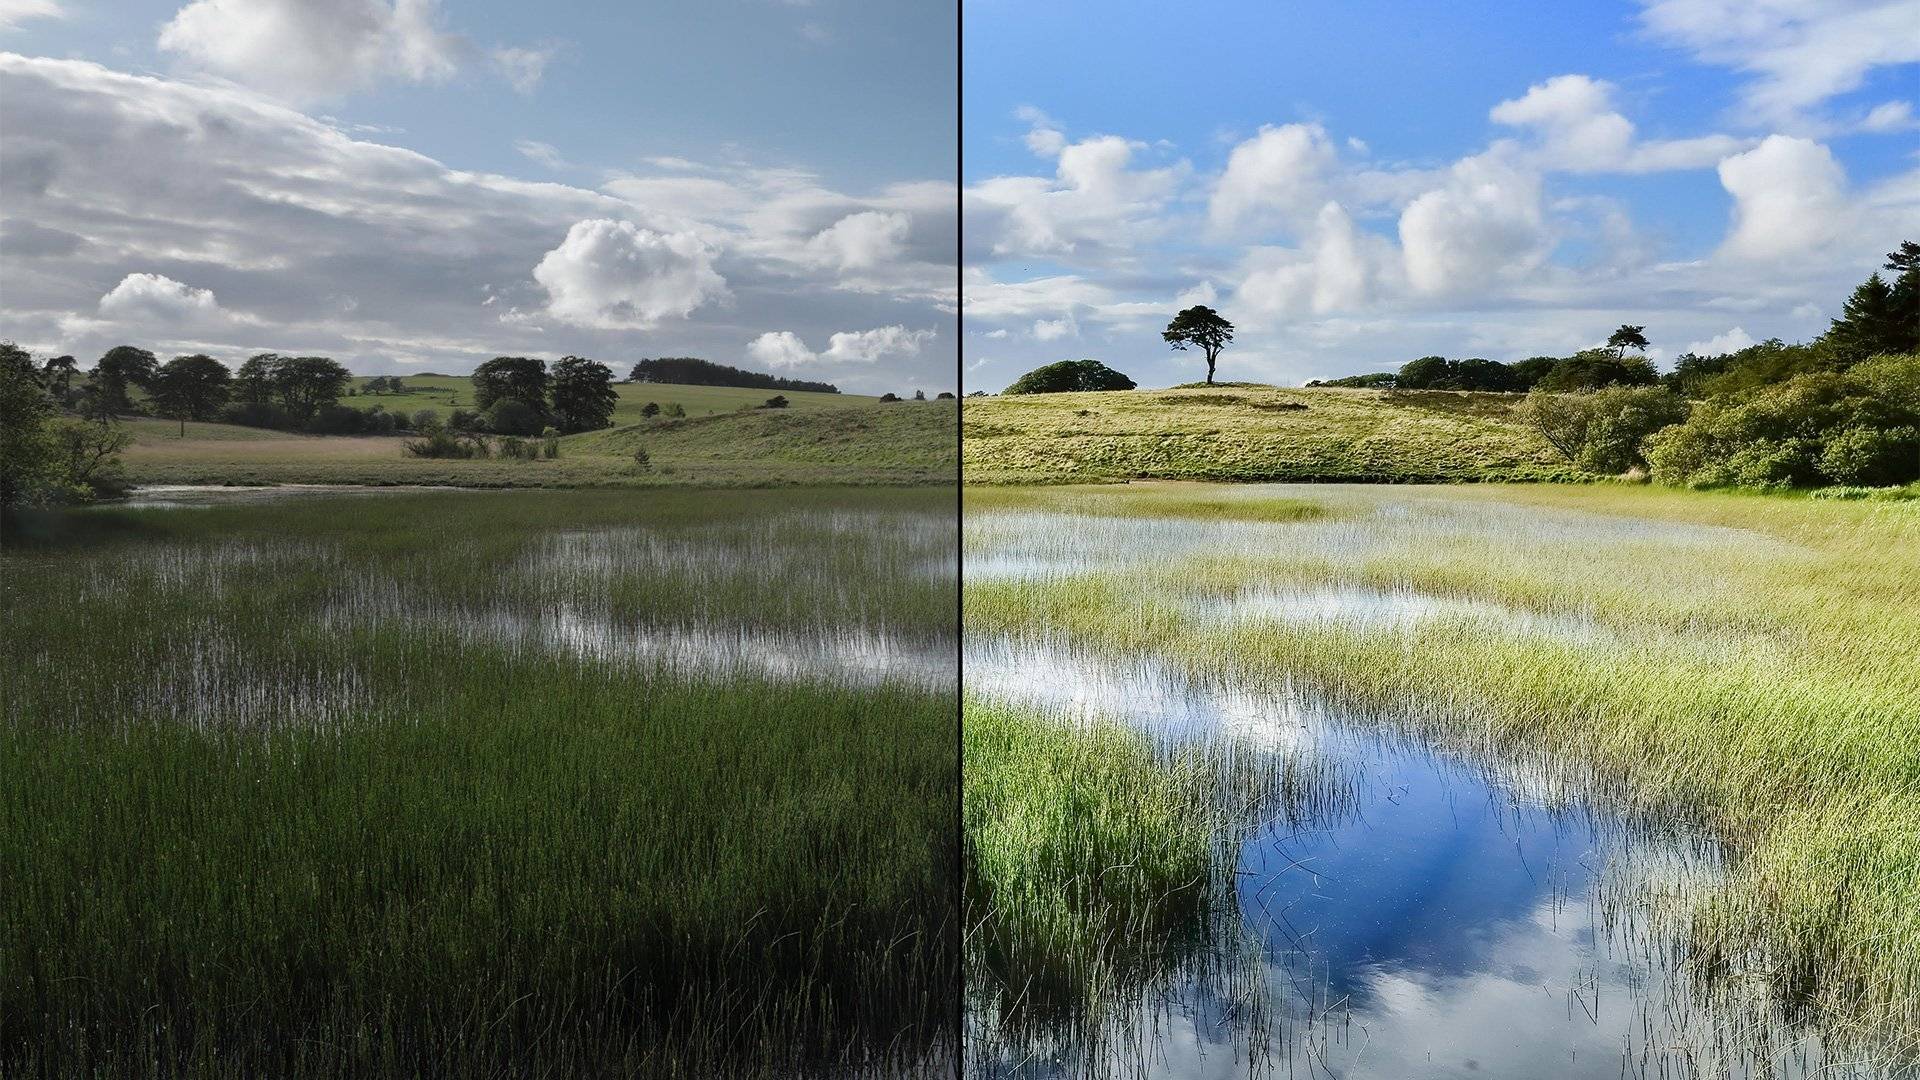
Day 3: Color Correction Fundamentals
Adjusting tones for mood and accuracy
Day 3 focuses on the vital area of color correction, an essential step in enhancing both realism and emotion. Learners study contrast, brightness, exposure, and white balance adjustments. Understanding how color changes can affect perception is key; even minor modifications can make an image appear more vibrant, warmer, or dramatic. Working with curves and levels becomes part of the routine. Students are encouraged to analyze how skin tones, skies, or shadows behave under different tonal settings. Structured daily tasks ensure that these complex concepts are easier to absorb.
Day 4: Layers and Non-Destructive Editing
Organizing edits while protecting the original
Layers are at the heart of controlled editing. This day introduces the principle of non-destructive editing—an approach that safeguards original visuals while enabling extensive changes. Learners use GIMP or similar platforms to create and manage multiple layers. From text overlays to adjustment layers, each addition becomes a new step in visual construction. The session also covers layer opacity, blend modes, and organizing techniques. The ability to isolate and refine individual elements gives editors more power and flexibility, making it easier to test variations and creative choices.
Day 5: Retouching Techniques for Detail Work
Correcting imperfections and enhancing clarity
Image retouching is where attention to fine detail makes a visible difference. Day 5 introduces basic tools such as clone, heal, blur, and sharpen to reduce distractions and refine elements. Removing blemishes, dust, or unwanted objects allows the central subject to stand out. Exercises guide students in subtle adjustments, especially for portraits, nature, or product photos. The goal is to improve without exaggeration. Proper retouching teaches patience and careful observation, vital skills for more advanced stages.
Day 6: Adding Text and Creative Elements
Incorporating communication through visuals
This day is all about layering in meaning. Students learn to place text and graphic elements in a way that supports the image without overpowering it. Typography choices, spacing, alignment, and contrast all play important roles in visual communication. Lessons cover how to match visual tone with message—formal or playful, minimal or bold. Experimentation is encouraged, and tasks may involve crafting mock advertisements or posters. By this stage, learners begin to see editing as both a technical and expressive craft.
Day 7: Filters, Effects, and Exporting (Important!)
Finalizing the look and sharing your vision
On the last day, students are introduced to filters and effects that can drastically change an image's mood or style. However, emphasis is placed on moderation and purposeful use. The lesson guides students through vintage, black-and-white, and lighting effects, helping them explore subtlety and thematic storytelling. Exporting techniques are reviewed, focusing on formats, resolution settings, and how to prepare images for online use or personal portfolios. Mastery of these steps gives learners the confidence to present their work professionally and with pride.
Practicing Beyond the Course Structure
Creating your own daily editing challenges
After completing the structured 7-day journey, learners are encouraged to develop their own editing goals. Setting up weekly projects, joining virtual communities, or practicing with image prompts are excellent ways to deepen skills. Using tools like GIMP regularly ensures fluency and comfort over time. Daily editing not only improves technique but also fosters creativity and self-expression. Learning to edit images is more than a technical task—it becomes a visual habit, a way of seeing and shaping the world.
Conclusion: A Creative Skill Built One Day at a Time
Reflecting on progress and continuing the path
In just seven focused days, new editors gain a broad yet solid understanding of the editing process. By tackling one concept per day, the experience remains manageable while providing noticeable results. Structured online lessons guide users step-by-step, combining theory with hands-on exercises. The result is a clearer sense of control, purpose, and creativity. Whether for personal enjoyment, artistic projects, or communication, image editing becomes a skill worth building—one thoughtful step at a time.