


TV
Essential Tools and Techniques in 7 Days

Day 1: Contrast and Brightness Control GIMP
Building image clarity through light and dark
On the first day of the course, learners focus on mastering contrast and brightness—two fundamental tools that immediately affect how an image feels. Adjusting brightness brings out hidden details, while contrast sharpens the separation between light and dark areas, making images more vibrant or moody. This session introduces the purpose behind these adjustments and teaches how to avoid common mistakes like overexposure or flattening. Daily exercises guide users through subtle enhancements, sharpening visual judgment. By the end of Day 1, learners develop an instinct for using light to draw focus and define mood.
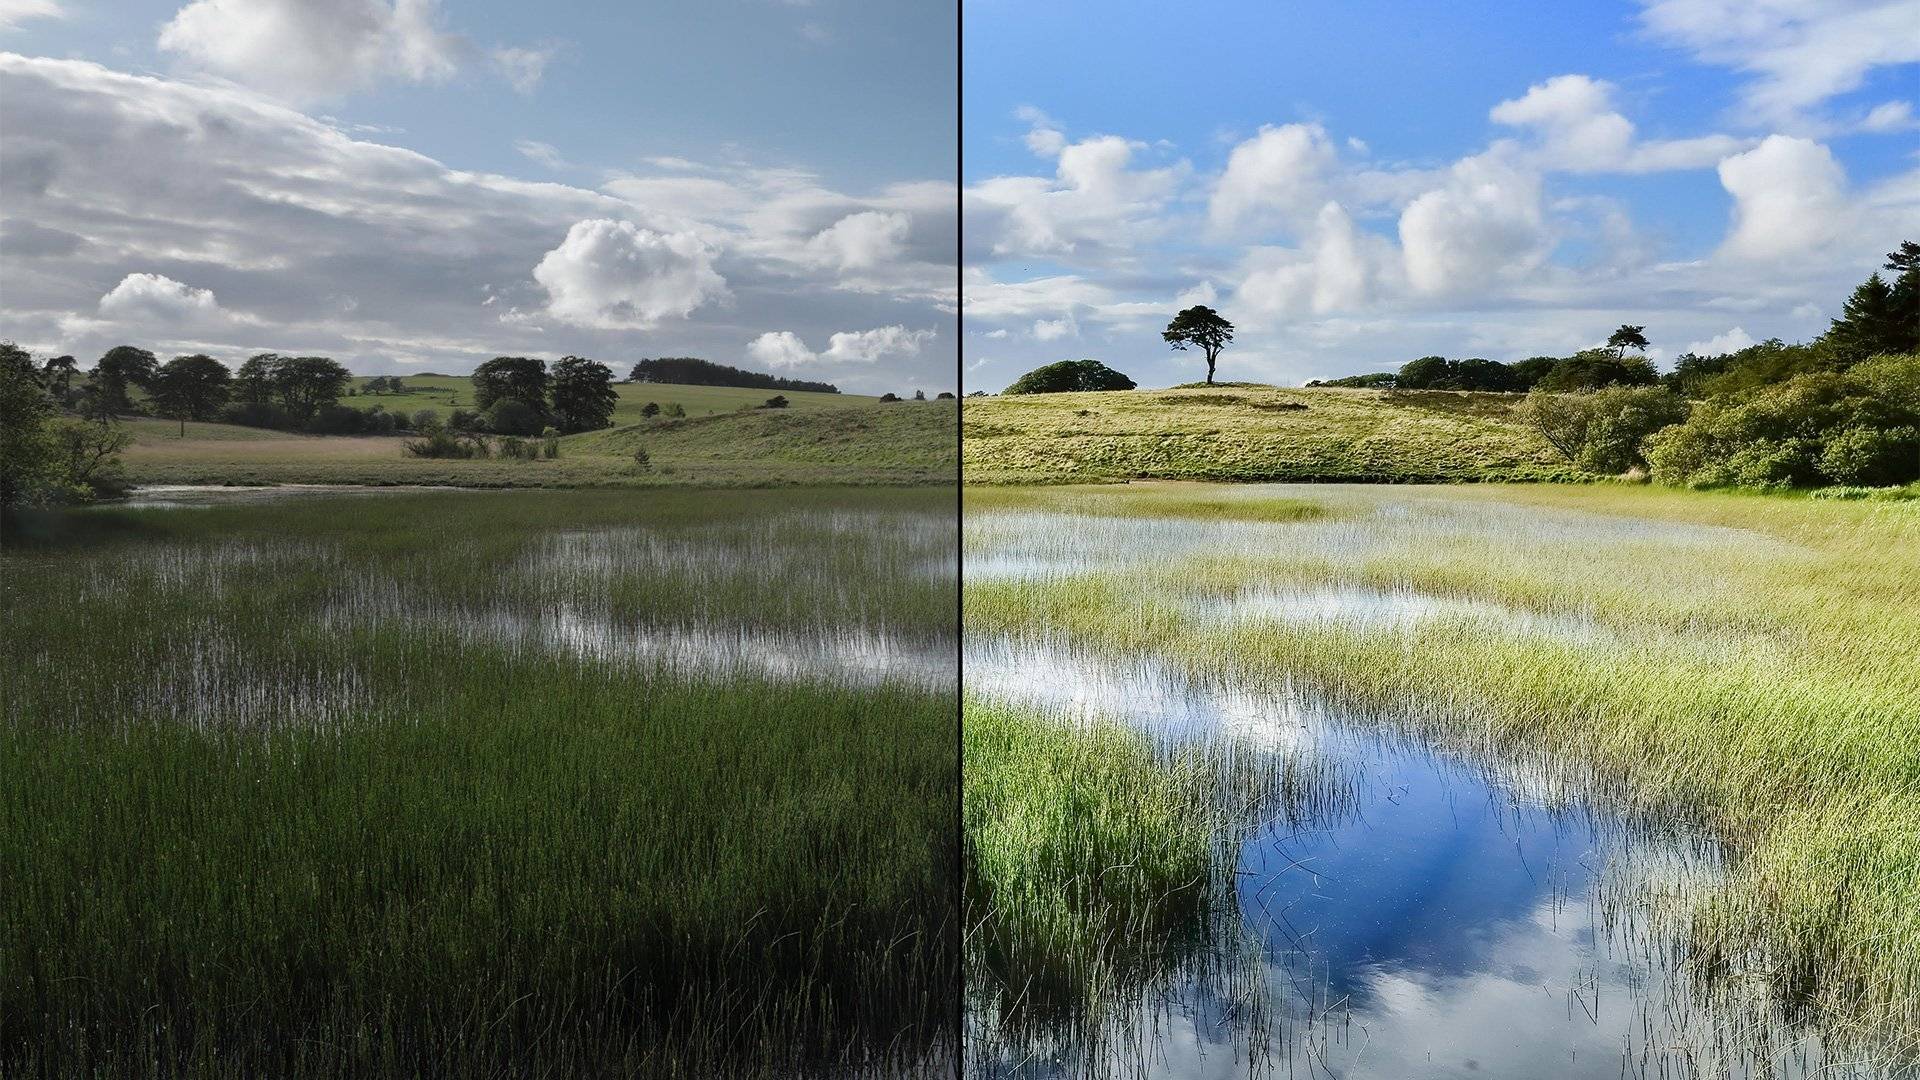
Day 2: Exploring Shadows and Highlights
Adding depth and drama to flat visuals
Day 2 introduces the importance of shadows and highlights. These two elements are critical in shaping an image’s depth and visual hierarchy. Learners use tools to recover lost shadow details or tone down overly bright areas. The session explores scenarios where adjustments can either correct exposure issues or introduce artistic effects, such as increased depth or spotlight emphasis. Working on real-world examples, such as portraits or landscapes, helps users gain experience in balancing visual elements to ensure a natural and appealing look. Precision and restraint are emphasized to maintain the original character of the image.
Day 3: Mastering the Brush Tool
Precision edits for targeted control
The brush tool, often underestimated, becomes the focus of Day 3. It offers high precision and flexibility in editing. Participants learn how to adjust size, opacity, hardness, and color to perform tasks ranging from dodging and burning to painting over small imperfections. Techniques for masking, softening edges, and blending colors are introduced. GIMP is suggested as a practical platform for brush experiments. Through repeated practice, learners begin to see how the brush tool supports both correction and creativity, serving as a gateway to controlled and detailed enhancements in various types of editing projects.
Day 4: Making and Using Cutouts Effectively
Isolating elements for creative control
Cutouts allow editors to separate objects from their backgrounds for composite work or focus. On Day 4, learners tackle methods for making precise selections—ranging from quick lasso work to refined edge masking. The lessons explore how to maintain natural contours, preserve shadow details, and avoid jagged outlines. This skill is especially useful for creating banners, collages, or adjusting individual parts of an image independently. Emphasis is placed on patience and the value of clean edges. Practice involves isolating figures, objects, and shapes for flexible image manipulation without sacrificing quality.
Day 5: Understanding and Applying Gradients
Creating smooth transitions and visual flow
Gradients add richness and dimension when used correctly. Day 5 teaches how gradients can be applied as backgrounds, overlay effects, or enhancement layers to improve visual flow. Learners experiment with linear, radial, and custom gradients to add lighting effects or blend sections smoothly. Lessons highlight how color choice, angle, and blend mode affect the outcome. Exercises include applying gradients in subtle ways to support the composition without overwhelming it. Mastery of this tool improves one’s ability to guide the viewer’s eye and build elegant transitions between elements within an image.
Day 6: Working with Layers and Masks
Organizing complex edits without disruption
Editing becomes significantly more efficient with layers and masks. Day 6 introduces learners to structured editing workflows using these tools. Layers allow changes without affecting the base image, while masks enable precise control over visibility. Users explore stacking order, opacity adjustments, and non-destructive masking. By creating projects that involve combining text, graphics, and images, participants gain comfort managing multi-layered designs. This day marks a turning point where students begin to feel confident navigating complex edits, increasing their speed and accuracy in professional-looking image development.
Day 7: Refining Edits and Exporting (Important!)
Preparing your image for presentation and use
On the final day, learners focus on review, refinement, and preparation. Lessons cover sharpening techniques, color harmony adjustments, and spotting unnoticed flaws. The goal is to bring together all tools learned so far—contrast, shadows, brushes, gradients—into a final polished image. Export settings are explained to ensure quality preservation for various uses like digital display or online sharing. GIMP is once again used to demonstrate how a complete workflow is managed from start to finish. By completing this step, students feel empowered to create images that are not only technically correct but visually compelling.
Gaining Confidence Through Repetition
Turning tools into everyday habits
The power of this 7-day structure lies in its focused yet progressive format. Each day provides space to dive deeply into a specific tool, allowing learners to absorb and apply concepts through repetition. Tools that once seemed confusing become familiar, and decisions that felt uncertain become instinctive. Daily reflection and practice lead to sharper control, quicker workflows, and more creative experimentation. By understanding not just how but why each tool is used, learners transition from casual users into confident image editors.
Conclusion: A Toolkit for Lasting Creativity
Moving forward with skills that grow
This structured weeklong journey does more than teach tools—it builds a mindset. Each editing feature, from shadows to masks, serves as a stepping stone toward more expressive and refined visual communication. The ability to assess images, choose the right adjustments, and apply them with care transforms the way learners interact with their work. Armed with this foundation, participants can continue exploring new techniques with confidence, knowing their core toolkit is solid. Editing becomes less of a mystery and more of an enjoyable, creative habit that deepens with every image.